Before I post this, I wanted to tell you that I've been using Windows Live Writer to post to my blog for years. For whatever reason, neither of my computers "recognize" WLW today!!! Very frustrating so I'm posting in the old blogger method...hopefully all the post and pictures show up. Please let me know if you don't see all the pictures....when I preview the post sometimes they all show and sometimes they don't! I'm beyond frustrated!!!!
In addition to that, my Facebook page appears to be compromised and no one is getting my posts on FB for the past 2 weeks! If that wasn't enough, my cell phone died last week and I had to get a new one...I've got to get someone to help me understand it! Moving on.....
I wanted some new candlesticks….not just any, but some chunky ones. However, I couldn’t find any I liked in my price range. So what’s a girl to do? It came to me one night (when I can’t sleep I think up things to do which can sometimes lead to trouble)….I remembered I had some variable height candlesticks somewhere out in the storage building…or at least I hoped I hadn’t sold them at our huge yard sale last fall. The first time I looked I couldn’t find them but I kept digging and lo and behold there they were underneath and behind some things (gotta clean out that storage building)!
Only problem was they were not exactly what I had in mind. I had bought them when I decorated with rich jewel colors (reds, gold, blacks, you know you had some of that stuff too)!
Very pretty in its day but it was time for a new look.
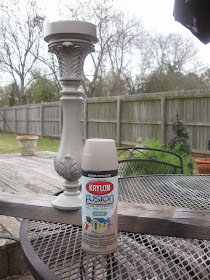
I wanted to make them look kind of a weathered gray and luckily I had a can of Krylon Spray paint in Satin River Rock.
I turned it upside down to be sure I got in all the nooks and crannies then flipped it and sprayed it right side up.
I sprayed one and after it dried it was too shiny and new looking.
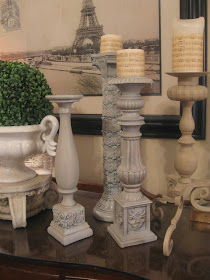
I had a little bottle of Folk Art Paint in Barn Wood and just dry brushed it on with a little disposable sponge brush which gave the candlestick a matte chalk-ish look which was exactly how I wanted them to look.
Obviously I need some new candles!
I had a few other candlesticks already a weathered gray look and while these don’t match exactly, that’s okay because I probably won’t be using them all in the vignette. I have two more that go with the one I painted but I ran out of spray paint (I didn't have much to begin with) so just as soon as I get more paint, I'll have a set of 3.
So if you have old candlesticks don’t be afraid to update them with a little paint and imagination.


Love the redo, the gray is fabulous. Hugs, Marty
ReplyDeleteThey look great in gray, Judy!
ReplyDeleteOh how we love a can of paint. It looks great Judy.
ReplyDeleteBlessings,
Linda
Looks great Judy! Love the gray!
ReplyDeleteLooks great Judy! Love the gray! :)
ReplyDeleteI love how they turned out!! Great color choice. Technology is great until it breaks! UGH...feel your pain.
ReplyDeleteJudy, your candlesticks look great in the gray! Great transformation!
ReplyDeleteI adore the new look you gave those candlesticks! I've always wanted to find a grey spray paint that looks like real grey and not blue. That one certainly does! I'll have to remember that one. Love how you aged them too. Your entire vignette looks beautiful.
ReplyDeleteGreat job, Judy. That really updated the look! You would never know they were black and gold. xo Diana
ReplyDelete